
Learning how to use ACF Pro in Elementor allows you to create dynamic WordPress websites where content is stored in custom fields and displayed automatically through your Elementor templates. This is especially useful for team profiles, real estate listings, portfolios, directories, events, and WooCommerce products that use the same layout but display different information.
By combining ACF Pro (Advanced Custom Fields) with Elementor’s Dynamic Tags, you can store information such as prices, job titles, images, dates, and contact details in custom fields and display them dynamically throughout your website. When you update a field value, Elementor automatically displays the new content without requiring you to edit the page layout.
If you’re new to dynamic content, the setup can seem confusing. Custom fields may not appear in Elementor, widgets can remain empty, or Dynamic Tags may not show the ACF fields you expect.
This guide walks you through the process step by step, from creating your first ACF field group to connecting custom fields with Elementor and troubleshooting common display issues.
1. What Is ACF Pro and Why Use It with Elementor?
Elementor makes it easy to design WordPress pages, while ACF Pro (Advanced Custom Fields) helps you manage structured content through custom fields. This makes it easier to store information such as a team member’s job title, a property’s price, an event date, or a product specification. It lets you create custom fields for information that WordPress doesn’t provide by default, such as a team member’s job title, a property’s price, an event date, or a product specification.
Elementor can then retrieve those values through Dynamic Tags and display them within your templates. Instead of entering the same information manually on every page, you can create a template once and let Elementor display the appropriate ACF data for each post.
For example, a team directory could use ACF Pro fields for a person’s position, email address, profile photo, and LinkedIn URL. After creating a single Elementor template, each team member can use the same layout while displaying their own information. This makes the website easier to maintain, more consistent, and faster to update.
2. Requirements Before Using ACF Pro with Elementor
Before creating custom fields or building dynamic templates, make sure your website is properly set up. Most issues, such as missing Dynamic Tags or fields that don’t appear in Elementor, are caused by an incomplete setup rather than by either plugin.
2.1 Install Elementor Pro
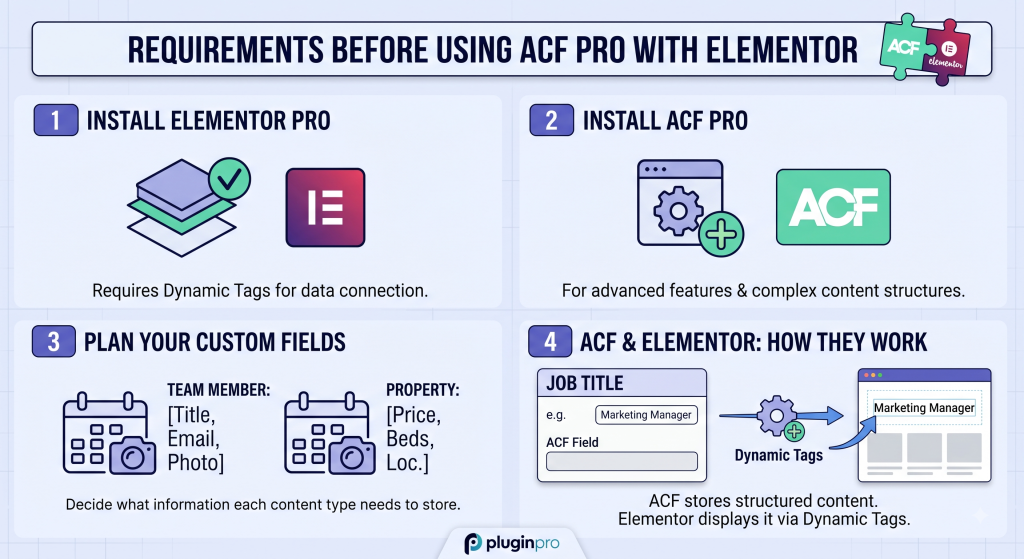
Displaying ACF fields in Elementor through Dynamic Tags requires Elementor Pro. While the free version includes the page builder, Elementor Pro provides the Dynamic Tags functionality needed to connect widgets to custom field data.
Before continuing, make sure that:
- Elementor is installed.
- Elementor Pro is installed and activated.
If you don’t see the Dynamic Tags icon when editing a widget, check that Elementor Pro is installed and active.
2.2 Install ACF Pro
Next, install and activate ACF Pro.
The free version of ACF supports many common custom field types, while ACF Pro adds advanced features such as Repeater, Flexible Content, Gallery, Clone, and Options Pages. These features can be useful when your website needs more complex or reusable content structures.
2.3 Plan Your Custom Fields
Before creating your fields, decide what information each content type needs to store.
For example, a team member page might include a job title, email address, and profile photo, while a property listing could include a price, number of bedrooms, and location. Planning this structure keeps your content consistent and makes your Elementor templates easier to build.
2.4 Understand How ACF and Elementor Work Together
ACF stores structured content, while Elementor controls how that content is displayed on the front end.
For example, you might save an employee’s job title in an ACF field named team_position. Elementor can then retrieve that value through a Dynamic Tag and display it in a Heading widget. Once the connection is set up, you can update the custom field without changing the page layout.
3. How to Use ACF Pro in Elementor
Once ACF Pro and Elementor Pro are installed, you can create custom fields, add content to those fields, and connect them to Elementor widgets using Dynamic Tags. The following steps show how to set up a basic dynamic content workflow.
3.1 Create a Field Group
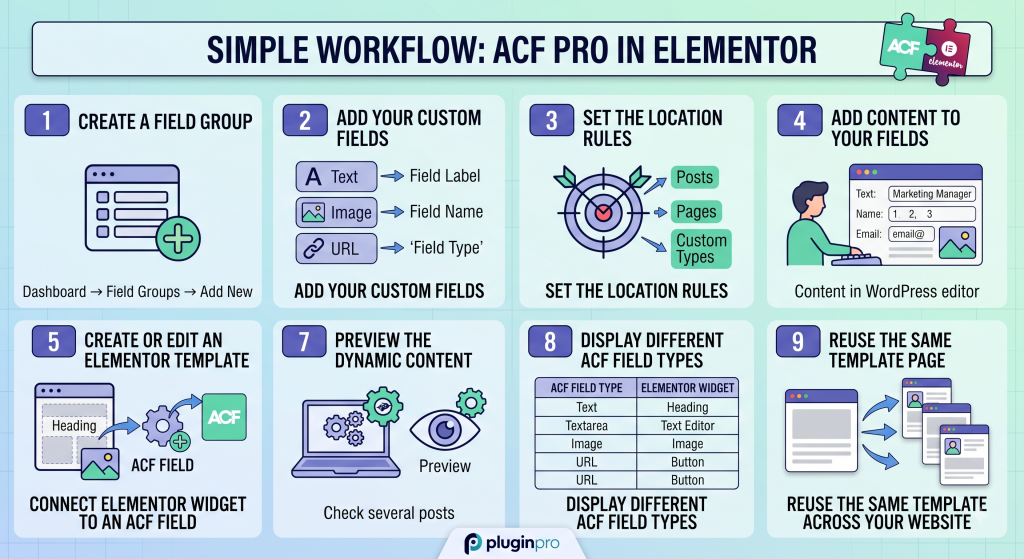
In your WordPress dashboard, go to Custom Fields → Field Groups and click Add New.
A Field Group is a collection of related custom fields assigned to a specific type of content. For example, if you’re building a team directory, you could create a field group called Team Member Information.
Give the Field Group a clear, descriptive name so it’s easy to identify later.
3.2 Add Your Custom Fields
Click Add Field to create your first custom field.
Each field has three important settings:
- Field Label: The name you see when editing content, such as Team Position.
- Field Name: The unique identifier used to reference the field, such as team_position.
- Field Type: Determines what kind of content the field stores, such as Text, Image, URL, or Date Picker.
For example, you could create a Team Position of type “field type”. You could then add additional fields for an email address, phone number, profile photo, or biography.
Choose a field type that matches the content you plan to store. Using the appropriate field type helps keep your content structured and makes it easier to display through Elementor.
3.3 Set the Location Rules
Scroll to the Location Rules section and choose where the Field Group should appear.
For example, you can assign it to:
- Posts
- Pages
- WooCommerce Products
- Custom Post Types
Make sure the Location Rules match the content you want to edit. If the rules are incorrect, the custom fields won’t appear in the WordPress editor.
3.4 Add Content to Your Custom Fields
Open a post, page, product, or custom post type that matches your Location Rules.
You should now see the ACF fields in the WordPress editor. Enter the information you want Elementor to display, then save or update the content.
For example, a team member profile might contain:
- Team Position: Marketing Manager
- Team Email: [email protected]
- Team Phone: +1 555 123 4567
Make sure the fields contain saved values before testing them in Elementor. Empty fields won’t display dynamic content on the front end.
3.5 Create or Edit an Elementor Template
Open the page or template where you want to display your ACF data in Elementor.
For content types that use the same layout, such as team members or real estate listings, a Single Template is often the better approach when multiple posts share the same structure. You can create the layout once and let Elementor display the appropriate ACF values for each post.
3.6 Connect an Elementor Widget to an ACF Field
Add a widget that matches the type of content you want to display. For example, use a Heading widget for a job title or an Image widget for a profile photo.
Instead of entering the content manually, click the Dynamic Tags icon next to the widget’s content field and select ACF Field.
Elementor will then let you choose the ACF field you want to display. Select the appropriate field, and the widget will retrieve its value from the current post.
For example, if your Heading widget is connected to the team_position field, Elementor will display the job title stored in that field.
3.7 Preview the Dynamic Content
Click Update and preview the page on the front end.
If the setup is correct, Elementor will display the value stored in your ACF field. When using a Single Template, make sure the preview is based on a post that already contains ACF data.
In Elementor’s Preview Settings, select an existing post with completed custom field values. This lets you verify how the dynamic content will appear before publishing the template.
It’s also a good idea to preview several posts with different amounts of content. This helps you catch layout issues caused by longer titles, descriptions, or other variable data.
3.8 Display Different ACF Field Types in Elementor
Different ACF field types can be connected to different Elementor widgets. The following table shows common combinations:
| ACF Field Type | Recommended Elementor Widget |
| Text | Heading or Text Editor |
| Textarea | Text Editor |
| Image | Image |
| URL | Button |
| Text Editor or Button | |
| Date Picker | Heading or Text Editor |
| WYSIWYG | Text Editor |
The exact display method can vary depending on the ACF field type and Elementor widget. If a field doesn’t display as expected, check the field configuration and Dynamic Tag settings first.
For more advanced ACF Pro fields, such as Repeater, Gallery, and Flexible Content, the setup can be more complex. Depending on the field and layout you need, you may need Elementor’s available dynamic content features, custom code, or a compatible third-party integration.
3.9 Reuse the Same Template Across Your Website
One of the main benefits of using ACF Pro with Elementor is that you can create a template once and reuse it across multiple pieces of content.
For example, a single team member template can display a different name, position, photo, email address, and biography for every team member. The layout stays consistent while the ACF field values change for each post.
This approach is particularly useful for content-heavy websites where multiple entries need to follow the same layout while displaying different data.
4. Common Problems When Using ACF Pro with Elementor
Most issues with ACF Pro and Elementor stem from configuration problems rather than plugin errors. If your custom fields aren’t appearing or your dynamic content isn’t displaying correctly, check the following issues first.
4.1 ACF Field Doesn’t Appear in Elementor
If the ACF Field isn’t available in Elementor’s Dynamic Tags list, first make sure Elementor Pro and ACF Pro are installed and activated.
Then, verify that the field has been created and saved correctly in ACF. If you recently added the field, refresh the Elementor editor and check the Dynamic Tags list again.
4.2 ACF Fields Don’t Appear in the WordPress Editor
If your custom fields aren’t visible when editing a post or page, check the Field Group’s Location Rules.
The rules must match the content type you’re editing. For example, a Field Group assigned to a custom post type won’t appear when you’re editing a regular WordPress page.
4.3 The Elementor Widget Is Empty
An empty widget usually indicates that the selected ACF field doesn’t have a saved value.
Open the post you’re previewing and check that the relevant field contains content. Then, verify that the Elementor widget is connected to the correct ACF field through Dynamic Tags → ACF Field.
If you’re using a Single Template, make sure the preview is loading a post that contains the ACF data you’re testing.
4.4 The Single Template Doesn’t Appear
If your Elementor Single Template isn’t being applied, check its Display Conditions.
Make sure the template is assigned to the correct post type or content group. A correctly designed template won’t appear on the front end if its Display Conditions don’t match the current content.
4.5 An ACF Image Doesn’t Display
If an ACF Image field doesn’t appear in an Elementor Image widget, first check that an image has been saved in the field.
Then review the field’s Return Format and make sure it is compatible with the Elementor Image widget. If necessary, try using Image ID or Image Array, depending on your Elementor and ACF setup. Reconnect the Dynamic Tag if necessary and test the template with another image.
4.6 Your Changes Don’t Appear
If you’ve updated an ACF field but still see the previous value, caching may be preventing the latest content from appearing.
Clear your browser cache and any WordPress, CDN, or hosting cache you’re using. You can also check Elementor → Tools and use the available options to regenerate CSS and data when necessary.
4.7 The Layout Changes Between Posts
Dynamic content can vary in length and size between posts. A short job title, long biography, or differently sized image can affect spacing, alignment, and proportions.
Preview your Elementor template with several posts that contain varying amounts of content before publishing. This helps you identify layout issues and create a more consistent design.
5. FAQ
5.1 Can I use ACF Pro with Elementor Free?
You can create custom fields with ACF Pro regardless of which version of Elementor you use. However, displaying ACF fields through Elementor’s Dynamic Tags requires Elementor Pro.
5.2 Do I need coding knowledge to use ACF Pro with Elementor?
No. You can build many dynamic WordPress websites using ACF Pro and Elementor Pro directly from the WordPress dashboard. Coding may be useful for advanced layouts, custom integrations, or functionality that isn’t available through the built-in tools.
5.3 Can I use ACF Pro with custom post types?
Yes. ACF Pro works well with custom post types, making it useful for directories, portfolios, real estate listings, events, team websites, and other structured content. Assign your Field Group to the appropriate post type, add your content, and connect the fields to your Elementor template.
5.4 Does ACF Pro work with WooCommerce?
Yes. You can use ACF Pro to store additional product information, specifications, FAQs, downloadable resources, and other structured data. These fields can then be displayed dynamically on WooCommerce product pages using Elementor.
5.5 Where can I get ACF Pro?
If you’re building multiple WordPress websites and need access to ACF Pro along with other premium WordPress plugins and themes, PluginPro offers membership plans that can help you access the tools you need across different projects. PluginPro also provides WordPress tutorials and installation guides to help you get started with these tools.
6. Conclusion
Learning how to use ACF Pro in Elementor gives you a flexible way to build dynamic WordPress websites without manually creating separate layouts for every piece of content. By storing structured information in custom fields and connecting those fields to Elementor widgets through Dynamic Tags, you can create reusable templates that are easier to maintain and update.
Once you’re comfortable with the basic workflow, you can expand your projects by combining Advanced Custom Fields with custom post types, WooCommerce, Elementor Theme Builder, and more advanced field structures. This approach works particularly well for directories, portfolios, real estate listings, events, team websites, and other content-driven projects.
If you’re working on multiple WordPress projects, PluginPro can also help you access ACF Pro and other WordPress plugins and themes, along with practical tutorials and installation guides to support your workflow.