
Learning how to install ACF Pro correctly is straightforward, but beginners can still run into problems if they upload the wrong ZIP file, skip license activation, or confuse ACF Free with ACF Pro.
Advanced Custom Fields Pro adds powerful features such as Repeater Fields, Flexible Content, Gallery, and Clone. These features aren’t available in the free version, making ACF Pro a useful choice for custom WordPress websites, client projects, and WooCommerce stores.
In this guide, you’ll learn how to install ACF Pro, activate your license, and check that the Pro features are working correctly. You’ll also learn how to fix some of the most common installation problems.
1. What You Need Before Installing ACF Pro
Before you install ACF Pro, make sure your WordPress website is ready. A few simple checks can help you avoid compatibility issues and installation problems.
1.1 Check Your WordPress and PHP Versions
Make sure your WordPress website and PHP version meet the requirements of the ACF Pro version you’re installing. Running outdated software may cause compatibility issues.
You can check your WordPress version under Dashboard → Updates.
To check your PHP version, go to Tools → Site Health → Info → Server.
If your PHP version is outdated, update it through your hosting control panel before installing ACF Pro.
1.2 Back Up Your Website
Creating a backup before installing a new plugin is a good precaution, especially if your website already uses a custom theme, page builder, WooCommerce, or other plugins.
If something goes wrong during installation, you can restore your website and try again.
1.3 Download the ACF Pro ZIP File
Make sure you have the correct plugin file before you start.
The file you upload to WordPress should be:
acf-pro.zip
If your download contains multiple files, locate the acf-pro.zip file and upload that file to WordPress. Do not extract the plugin ZIP before uploading it.
2. How to Install ACF Pro in WordPress
Once you have the correct ZIP file, you can install ACF Pro directly from your WordPress dashboard.
2.1 Log In to Your WordPress Dashboard
Open your WordPress admin area and sign in with an administrator account.
Most WordPress websites use:
yourdomain.com/wp-admin
2.2 Open the Plugin Upload Screen
From the left sidebar, go to:
Plugins → Add New Plugin
Then click Upload Plugin at the top of the page.
This opens the upload screen, where you can install ACF Pro from a ZIP file.
2.3 Upload the ACF Pro ZIP File
Click Choose File and select:
acf-pro.zip
Make sure you’re uploading the ZIP file itself rather than an extracted folder.
Once you’ve selected the file, click Install Now.
2.4 Install and Activate ACF Pro
WordPress will upload the ZIP file, extract the plugin files, and install ACF Pro on your website.
When the installation finishes, click Activate Plugin.
Once activated, you should see a Custom Fields menu in your WordPress dashboard. This confirms that ACF Pro has been installed and activated successfully.
2.5 Activate Your ACF Pro License
If you purchased ACF Pro directly from the developer, you can activate your license to receive automatic updates and access official support.
In your WordPress dashboard, go to:
Custom Fields → Updates
Enter your license key and click Activate License.
If you access ACF Pro through a GPL membership service, the plugin can be installed and used in accordance with that service’s terms. However, a GPL membership is separate from an official ACF Pro license, so official license activation, updates, and support may differ.
Looking for ACF Pro and other premium WordPress tools?
PluginPro gives you access to ACF Pro and a collection of premium WordPress plugins and themes through affordable plans, making it a convenient option for users managing multiple WordPress projects.
2.6 Check That ACF Pro Features Are Working
After activating ACF Pro, you can verify that the Pro features are available by creating a field group and checking the field type options.
Look for Pro field types such as Repeater, Flexible Content, Gallery, and Clone.
You’ll complete this verification in the next section.
3. How to Verify Your ACF Pro Installation
After installing ACF Pro, you can create a simple field group to make sure everything is working correctly. This quick test is especially useful if you’ve upgraded from ACF Free or recently migrated your website.
Follow these steps:
- Go to Custom Fields → Field Groups in your WordPress dashboard.
- Click Add New.
- Enter a name for your field group, such as Product Details or Team Information.
- Click Add Field and choose a field type. You should see Pro field types such as Repeater, Flexible Content, Gallery, and Clone alongside the standard field options.
- Under Location Rules, choose where you want the field group to appear, such as Posts, Pages, WooCommerce Products, or a custom post type.
- Click Publish to save the field group.
- Open the content type you’ve selected and check the editor. Your new custom fields should now appear.
If the fields appear as expected, your ACF Pro installation is complete and ready to use.
4. ACF Pro Installation Problems You May Run Into
An incorrect plugin file, a version conflict, or a missing license setup causes most ACF Pro installation problems. Here are some of the most common issues and what you can do about them.
4.1 You Uploaded the Wrong ZIP File
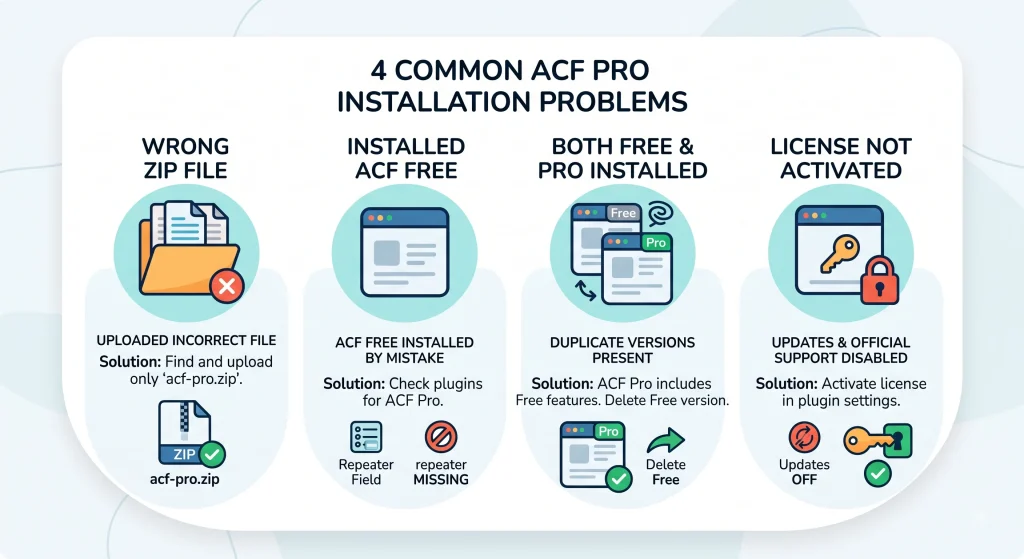
For a standard ACF Pro installation, upload the acf-pro.zip plugin file through Plugins → Add New Plugin → Upload Plugin.
If you upload the full download package or an extracted folder instead, WordPress may not be able to install the plugin correctly.
If your download contains multiple files, locate the acf-pro.zip file and upload that file.
4.2 You Installed ACF Free Instead of ACF Pro
The free version of ACF is available in the WordPress Plugin Directory, so it’s easy to install it by mistake.
If you don’t see Pro field types such as Repeater, Flexible Content, Gallery, or Clone, go to Plugins → Installed Plugins and confirm that ACF Pro is installed and activated.
4.3 Both ACF Free and ACF Pro Are Installed
If you upgraded from ACF Free to ACF Pro, check your installed plugins to make sure you don’t have unnecessary duplicate versions.
ACF Pro includes the functionality provided by the free version, so you generally only need ACF Pro installed and active.
4.4 You Haven’t Activated Your License
If you purchased ACF Pro directly from the developer, activating your license gives you access to automatic updates and official support.
Your website can continue to use the plugin without an activated license, but you won’t receive license-based updates and support until the license is activated.
4.5 The Plugin Upload Fails
If WordPress rejects the ACF Pro ZIP file during installation, check your website’s upload limits and server configuration.
If the ZIP file exceeds the allowed upload size, you may need to increase the upload_max_filesize and post_max_size values through your hosting control panel or contact your hosting provider for assistance.
You should also make sure you’re uploading the original acf-pro.zip file, not an extracted folder or an incorrect download package.
5. FAQs
5.1 Can I Install ACF Pro Without the Free Version?
Yes. You don’t need to install ACF Free before installing ACF Pro.
ACF Pro includes all functionality available in the free version, so you only need the Pro plugin installed and active on your website.
5.2 Will Installing ACF Pro Affect My Existing Website?
Installing ACF Pro won’t change your existing posts, pages, or theme on its own. The plugin adds custom field functionality that you can use wherever you need it.
However, creating a backup before installing a new plugin is still a good idea, especially if you’re working on a production website.
5.3 Can I Use ACF Pro With Elementor or Other Page Builders?
Yes. ACF Pro can work with popular WordPress page builders such as Elementor, Bricks Builder, and Beaver Builder.
You can use custom field data with supported dynamic content features to display information in your templates without manually adding the same content to each page.
5.4 What Happens If My ACF Pro License Expires?
An expired ACF Pro license does not automatically remove your existing custom fields or content. However, license-related benefits such as access to updates and official support may no longer be available until the license is renewed.
If your website relies on ACF Pro for important functionality, keeping the plugin updated and maintaining an appropriate license or access plan can help you maintain compatibility and ongoing support.
5.5 Where Can You Download ACF Pro?
You can purchase ACF Pro directly from the official developer or access it through Pluginpro. If you’re looking for premium WordPress plugins without purchasing each one individually, Pluginpro offers affordable plans, including a $4.5 per-item option and membership packages for users who need access to multiple products.
6. Conclusion
Installing ACF Pro in WordPress is a straightforward process when you have the correct plugin package and follow the installation steps carefully. Download the appropriate acf-pro.zip file, upload it through the WordPress dashboard, activate the plugin, and verify that the Pro field types are available.
If you have an official ACF Pro license, activate it from Custom Fields → Updates to access the license-related update and support benefits provided by the developer.
For users looking to access multiple premium WordPress tools with a single membership, PluginPro offers ACF Pro and a growing collection of premium plugins and themes. It can be a practical option for users managing multiple websites or working on different WordPress projects.