
Creating a professional WordPress website no longer requires advanced coding skills. Thanks to powerful visual builders, anyone can design beautiful, responsive websites with ease. Among the most popular solutions available today, Avada has earned a reputation as one of the most versatile and feature-rich WordPress themes available.
If you’re searching for how to use Avada website builder, this comprehensive guide will walk you through everything from installation and setup to designing pages, optimizing performance, troubleshooting common issues, and choosing the best plugins to extend your website’s functionality. Whether you’re a beginner launching your first website or an experienced designer exploring Avada, you’ll discover practical tips to build a fast, modern, and visually impressive website.
1. What Is Avada Website Builder and How Does It Work?
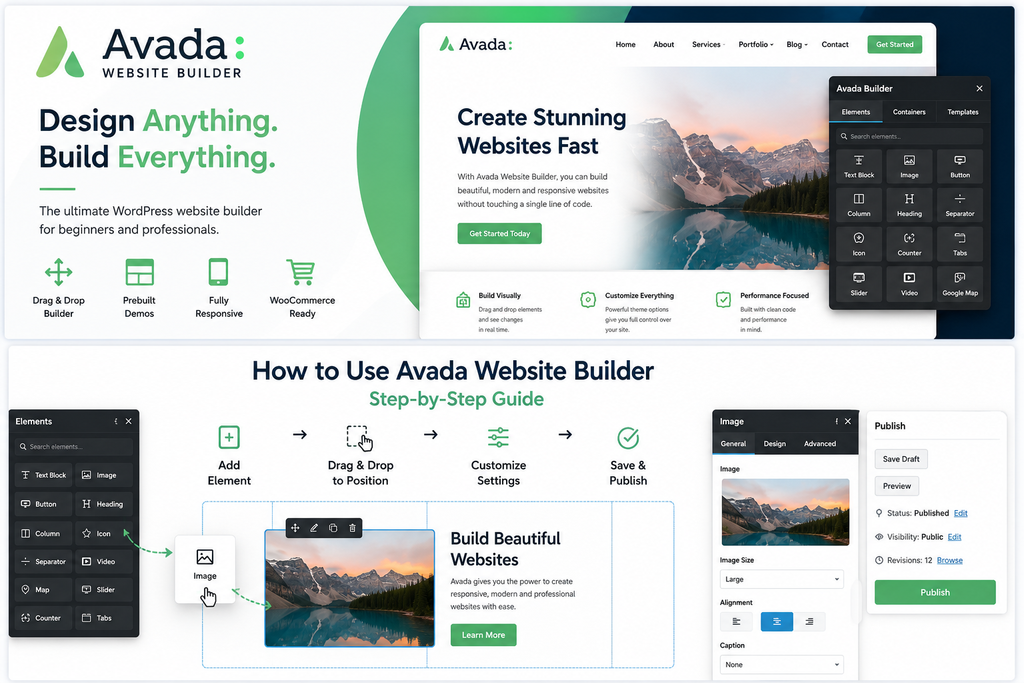
Avada is a WordPress theme that includes its own visual building tools through Avada Builder. It lets you create and customize page layouts without relying on a separate page builder.
The theme and builder are designed to work together, giving you access to page layouts, global design settings, headers, footers, and other site elements from the Avada interface.
Understanding how Avada is structured can make the website-building process easier:
- Global Design Settings: Use Avada’s global options to manage colors, typography, spacing, and other site-wide styles.
- Visual Page Building: Create page layouts with containers, columns, and elements, then adjust their content and appearance visually.
- Built-In Site Controls: Customize areas such as headers, footers, blog layouts, and WooCommerce pages within the same system.
Once you understand these core features, you can move on to using Avada Builder to create and customize your pages.
2. System Requirements and Prerequisites
Before setting up Avada, make sure your WordPress installation and hosting environment are ready. Checking these settings first can help prevent common issues such as failed prebuilt website imports or problems loading the visual builder.
| What to Check | Recommendation |
| WordPress | Use a current, supported version of WordPress |
| PHP | Use a PHP version supported by the current Avada release |
| PHP Memory | Allocate enough memory for Avada and your installed plugins |
| Execution Time | Increase the server limit if large imports or setup processes time out |
| Input Variables | Increase the limit if large Avada configurations cannot be saved |
| Avada License | Have a valid purchase code available for registration |
After activating Avada, use Avada → System Status to check your server configuration. If a setting is too low, Avada can help identify which server limits may need to be adjusted.
Required Avada Plugins
Avada uses two core companion plugins:
- Avada Core
- Avada Builder
Install and activate Avada Core before Avada Builder. You can then add optional plugins such as WooCommerce when your website requires them.
You do not need to install a separate contact form plugin just to start building with Avada, as Avada provides its own form-building functionality.
3. Step-by-Step Guide to Use Avada Website Builder
3. How to Use Avada Website Builder: Step-by-Step
Once Avada is installed and registered, you can start building your website. The standard workflow involves installing the core companion plugins, selecting a prebuilt layout or starting from scratch, configuring global styles, structuring pages with Avada Builder, and optimizing responsive breakpoints.
Step 1: Install the Avada Theme
Download the installation package from your ThemeForest account and locate the installable Avada theme ZIP file.
Inside your WordPress dashboard, navigate to Appearance > Themes > Add New > Upload Theme. Upload the ZIP file, click Install, and then Activate the theme.
Step 2: Register Your Avada License
Open the Avada dashboard and navigate to the registration panel. Enter the purchase code associated with your ThemeForest license and complete the registration process.
Registering your license provides access to official updates, technical support, and available design resources.
Step 3: Install Avada Core and Avada Builder
Go to Avada > Plugins in your WordPress sidebar. Install and activate:
- Avada Core
- Avada Builder
Be sure to install Avada Core before Avada Builder. These two companion tools provide the primary functionality needed for the visual editing workflow.
Step 4: Select a Prebuilt Website or Start From Scratch
Avada offers two primary ways to begin a project: importing a prebuilt template or building custom layouts from a blank page.
To use a starter template, navigate to Avada > Websites and browse the available options. Review the import settings before confirming to ensure you only load the specific content, media, or options required for your site.
If you prefer full control over your site architecture, skip the template import and create your layout directly with Avada Builder.
Step 5: Configure Global Design Options
Before styling individual pages, set up your site-wide design rules. Open Avada > Options and configure core settings such as:
- Global typography and line heights
- Primary and secondary color palettes
- Site container widths
- Default header and footer layouts
Establishing your main styles first ensures visual consistency across the entire site and reduces repetitive styling on individual elements.
Step 6: Build Pages with Avada Builder
Navigate to Pages > Add New and launch the editor using Avada Live for real-time visual editing or the standard back-end Avada Builder interface.
Avada structures pages using three core building blocks:
- Containers: Define the primary horizontal sections of a page.
- Columns: Divide containers into flexible grid areas.
- Elements: Add specific content blocks such as text, images, buttons, or accordions.
For example, you can build a standard hero section by adding a single Container, dividing it into two Columns, and placing a headline with text in the left Column and an image in the right Column.
Step 7: Adjust Mobile Breakpoints
After completing the desktop layout, review the page layout using the viewport preview options for tablet and mobile screens.
Check and adjust:
- Font sizing and line heights for readability
- Margin and padding spacing
- Column stacking behavior
- Element visibility on smaller displays
Fine-tuning spacing and visibility at each breakpoint prevents layout overlaps on mobile devices.
Step 8: Preview, Test, and Publish
Preview the entire page across all breakpoints before publishing. Test interactive components, including navigation menus, buttons, forms, and internal links.
Once you have verified that the layout works properly, click Publish to make the page live.
4. Best Practices for Maintaining an Avada Website
Once your pages are built, following a few structured practices makes your site easier to manage, faster to load, and more reliable over time.
4.1 Set Global Design Options First
Manage your core colors, typography, spacing, and layout settings through Avada’s global options and Color Palette settings rather than styling individual elements. Establishing global styles keeps your design consistent across pages and makes future updates easier.
4.2 Avoid Overloading Pages With Unnecessary Elements
Avada provides a wide range of elements, but using too many animations, heavy sliders, or video backgrounds can affect user experience and page performance. Keep your layouts focused and use visual effects only when they add value to the page.
4.3 Optimize Images Before Uploading
Large media files can increase page size and slow down loading times. Resize images to their intended display dimensions and use modern formats such as WebP where appropriate.
Avoid uploading full-resolution images when smaller files can provide the same visual quality.
4.4 Configure Avada Performance Settings Carefully
Review Avada’s built-in performance options and use the Performance Wizard where available. Disable Builder Elements or other features you do not need to reduce unnecessary processing and asset loading.
Before disabling an element, check your existing pages to make sure no active layouts depend on it.
4.5 Keep Core Components Updated
Keep WordPress, Avada, Avada Core, Avada Builder, and other installed plugins up to date. Before major updates, check compatibility and consider testing changes on a staging site to reduce the risk of unexpected conflicts.
4.6 Create Backups Before Major Changes
Create a complete backup before importing a prebuilt website, performing a major theme or plugin update, or making significant changes to your site configuration.
A recent backup gives you a reliable recovery point if an update or configuration change causes unexpected problems.
5. Troubleshooting Common Avada Builder Issues
Even with a proper setup, you may occasionally run into technical issues while building or managing an Avada website. The following solutions cover some common problems and practical ways to troubleshoot them.
5.1 Avada Builder Is Not Loading
If the visual editor fails to load, hangs continuously, or displays a blank screen, the issue may be related to plugin conflicts, outdated software, insufficient server resources, or browser JavaScript errors.
- Verify that Avada Core and Avada Builder are installed and updated to compatible versions.
- Check Avada → System Status in your WordPress dashboard for server or configuration warnings.
- Temporarily deactivate non-essential third-party plugins to identify potential conflicts.
- Clear your browser cache and inspect the browser console for JavaScript errors.
5.2 Slow Page Loading Speeds
Slow performance on an Avada site can result from unoptimized media, excessive visual effects, poorly configured optimization tools, or other plugins.
- Resize and optimize images before uploading them to the Media Library.
- Remove unnecessary sliders, complex animations, or heavy video backgrounds.
- Review Avada → Options → Performance and the Performance Wizard where available.
- Avoid running multiple caching or optimization plugins with overlapping CSS and JavaScript optimization features.
5.3 Prebuilt Website Import Fails or Times Out
If a prebuilt website import stops midway or times out, server resource limits and execution settings are common areas to check.
- Go to Avada → System Status and review memory limits, max_execution_time, and max_input_vars.
- Contact your hosting provider if the system status identifies insufficient server limits.
- If the full import continues to fail, try importing only the site content or components you need instead of importing everything at once.
5.4 Layout Breakpoints Look Misaligned on Mobile
If a page looks correct on desktop but appears misaligned on smaller screens, check the responsive settings applied to the affected containers, columns, and elements.
- Use Avada’s responsive preview controls to test tablet and mobile breakpoints inside the editor.
- Review responsive margins, padding, font sizes, and column stacking for affected layouts.
- Check custom CSS for fixed widths or other rules that may override responsive settings.
5.5 Changes Are Not Appearing on the Live Site
If changes saved in Avada Builder do not appear on the front end, cached content or generated styles may be showing an older version of the page.
- Clear your browser cache and any WordPress or page-cache plugin cache.
- Clear the CDN cache if your site uses a CDN.
- Review Avada’s dynamic CSS and performance settings if style changes are not being reflected.
- Test the page in an incognito window or another browser to confirm whether the issue is cache-related.
6. Recommended Plugins to Pair With Avada
Avada includes many built-in tools for page building and site customization, but additional plugins can extend your website with ecommerce, SEO, caching, backup, and security features.
6.1 WooCommerce for Ecommerce Stores
If you are building an online store, WooCommerce provides the core ecommerce features you need, including product management, shopping carts, checkout, and order processing.
Avada includes dedicated WooCommerce options, so you can use WooCommerce to manage your store while customizing product pages, shop layouts, and other store elements with Avada.
6.2 Rank Math SEO for Search Optimization
An SEO plugin can help manage search-related settings that are separate from the page-building process.
Rank Math SEO lets you manage features such as:
- SEO titles and meta descriptions
- XML sitemaps
- Schema markup
- Search appearance settings
Use only one primary SEO plugin on your site to avoid overlapping metadata and configuration issues.
6.3 WP Rocket for Caching and Performance
Avada includes built-in performance settings, but a dedicated caching plugin can provide additional caching and optimization features.
WP Rocket can help with:
- Page caching
- Browser caching
- File optimization
- Lazy loading
Avoid enabling the same CSS or JavaScript optimization features in multiple tools. After changing optimization settings, test your pages and interactive elements to make sure they continue to work correctly.
6.4 UpdraftPlus for Site Backups
Regular backups are especially useful before importing a prebuilt website, making major design changes, or updating Avada and its companion plugins.
UpdraftPlus can automate scheduled backups and store them in supported remote locations. You can also use a backup solution provided by your hosting provider if it offers the features you need.
6.5 Wordfence Security for Website Protection
A security plugin can add another layer of protection to your WordPress website.
Wordfence Security includes features such as:
- Web application firewall
- Malware scanning
- Login protection
- Brute-force protection
A security plugin should complement, not replace, regular WordPress, Avada, and plugin updates and secure hosting practices.
7. Frequently Asked Questions
7.1 Is Avada Website Builder beginner-friendly?
Yes. Avada is suitable for beginners because its visual builder lets you create and customize pages without writing code. It also provides advanced layout and design controls for more experienced users.
7.2 Can I use Avada without coding knowledge?
Yes. You can build and customize most parts of an Avada website visually using Avada Builder and the theme’s built-in options. Custom CSS or code is mainly needed for advanced styling or custom functionality.
7.3 Does Avada work with WooCommerce?
Yes. Avada integrates with WooCommerce and provides dedicated options for customizing shop pages, product layouts, shopping carts, and checkout designs.
7.4 How much does Avada cost on PluginPro?
PluginPro offers access to premium WordPress themes and plugins through flexible pricing options. You can access individual products for $4.5 per item or choose a membership package if you need multiple themes and plugins. Check the Avada product page on PluginPro for current availability and pricing details.
7.5 Is Avada better than other WordPress page builders?
It depends on your project requirements. Avada is a good choice if you prefer an integrated theme and builder with built-in design and layout controls instead of pairing a separate theme with a standalone page builder.
8. Conclusion
Learning how to use Avada website builder becomes much easier once you understand the basic setup, Avada Builder workflow, responsive controls, and performance settings. From installing Avada and importing a prebuilt website to creating custom layouts and troubleshooting common issues, the right workflow can help you build and manage your site more efficiently.
Whether you’re building a business website, portfolio, blog, or online store, Avada provides a flexible set of tools for creating and customizing your WordPress website.
Ready to start building with Avada? Explore Avada and other premium WordPress themes and plugins on PluginPro to find the tools you need for your next website.