
Installing the Avada theme is straightforward, but using the wrong installation package or an incorrectly configured server can lead to upload errors, failed demo imports, or plugin issues. Taking a few minutes to prepare your WordPress website before installation helps ensure everything works correctly from the start.
In this step-by-step guide, you’ll learn how to install Avada safely using either the WordPress dashboard or FTP, prepare your server, activate the required plugins, and complete the initial setup correctly.
1. Why Installing Avada Correctly Matters
Although installing Avada is relatively straightforward, many first-time users run into problems such as upload errors, failed demo imports, or missing functionality after activation. In most cases, these issues are not caused by the theme itself but by using the wrong installation package or an incorrectly configured hosting environment.
Taking a few minutes to prepare your WordPress website before installation can save significant troubleshooting later. By checking your server requirements, using the correct Avada.zip file, and installing the required plugins in the proper order, you can complete the setup smoothly and avoid the most common installation errors.
2. Pre-Installation Checklist: Preparing Your Server & Files
Before installing Avada, it’s worth taking a few minutes to prepare your server and download the correct installation files. These simple checks can help prevent common issues such as upload errors, failed demo imports, or incomplete installations later in the setup process.
2.1. Verify Server Hardware & PHP Requirements
Avada includes many built-in features and demo websites, so it works best on a server that meets the recommended PHP requirements. Before installing the theme, check your hosting environment to make sure the following settings are available.
| PHP Setting / Resource | Minimum Requirement | Recommended Setting (Optimal) |
| PHP Version | PHP 7.4 | PHP 8.1 or PHP 8.2+ |
| WordPress Memory Limit | 128M | 256M to 512M |
| max_execution_time | 180 seconds | 300 seconds |
| upload_max_filesize | 32M | 64M to 128M+ |
| post_max_size | 32M | 64M to 128M+ |
| max_input_vars | 1800 | 4000 to 8000 |
Tip: If your hosting plan only provides a 64M WordPress memory limit, you may experience errors when importing demo websites. Increasing the memory_limit to at least 256M is recommended for a smoother installation.
2.2. Download the Correct Theme Zip Package
One of the most common installation mistakes is uploading the wrong ZIP package instead of the installable Avada.zip file. Make sure you’re using the installable theme package before uploading it through the WordPress dashboard.
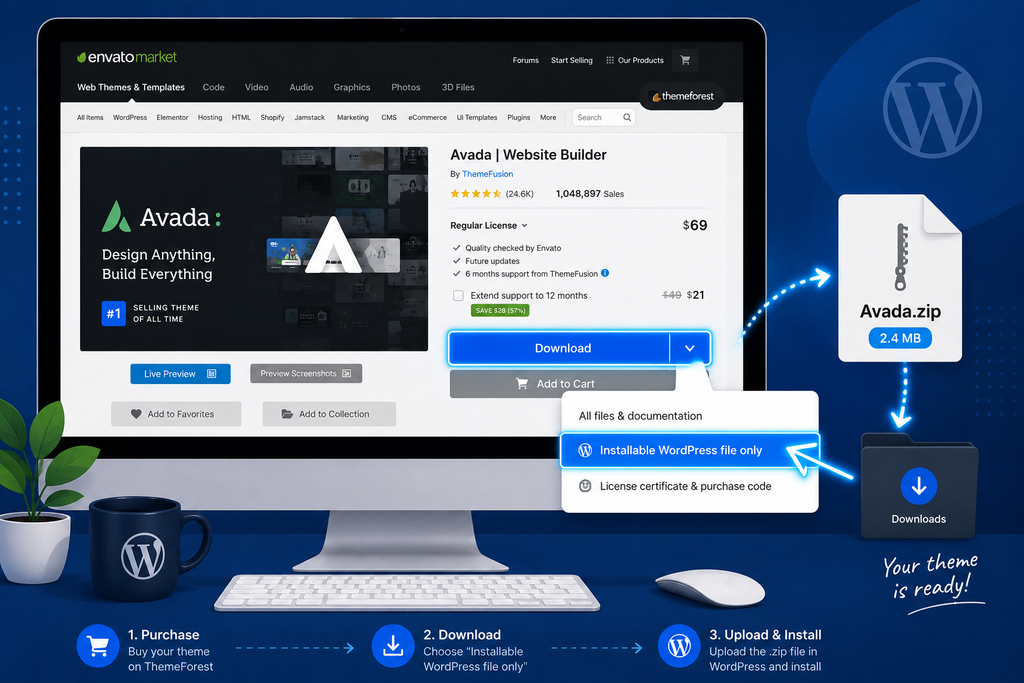
PluginPro Tip: If you downloaded Avada from PluginPro, simply use the provided Avada.zip installation file when uploading the theme through WordPress. Always make sure you’re using the latest version for the best compatibility with your WordPress installation.
2.3. Perform a Full Site Backup
If you’re installing Avada on a new WordPress website, you can usually skip this step. However, if you’re replacing an existing theme on a live website, creating a full backup is strongly recommended. This allows you to restore your website quickly if the installation or theme switch causes unexpected issues.
You can create a backup using plugins such as UpdraftPlus or All-in-One WP Migration, or use your hosting provider’s built-in backup or staging tools.
3. How to Install Avada Theme: 2 Methods
3.1 Install Avada via the WordPress Dashboard (Recommended)
This is the easiest way to install Avada and is suitable for most WordPress users. As long as your hosting meets the recommended requirements, the installation only takes a few minutes.
- Log into your WordPress WP-Admin Dashboard.
- In the left sidebar navigation, go to Appearance $\rightarrow$ Themes.
- Click the Add New button at the top of the screen, then click Upload Theme.
- Click Choose File and navigate to your computer to select the Avada.zip file.
- Click Install Now. WordPress will unpack the file and install the core theme files.
- Once the success message appears, click the Activate link.
After activation, confirm that the Avada Dashboard appears in your WordPress admin area. If it does, the theme has been installed successfully and you can continue with plugin installation.
Tip: If the upload fails with a “Link Expired” or file size error, don’t try uploading the same file repeatedly. Check your PHP upload limits or use the FTP installation method below instead.
3.2 Install Avada via FTP or Your Hosting File Manager
If you can’t upload Avada through the WordPress dashboard because of file size limits or upload errors, you can install it manually using FTP or your hosting file manager instead. In such cases, uploading via FTP (FileZilla) or your host’s cPanel File Manager is the safest workaround.
- Unzip the Avada.zip file on your computer to reveal a single folder named Avada.
- Connect to your web server using an FTP client (e.g., FileZilla) or open your hosting provider’s cPanel File Manager.
- Navigate to the theme directory: /public_html/wp-content/themes/.
- Upload the entire extracted Avada folder directly into the /themes/ directory.
- Wait for all files to transfer completely (ensure no failed transfers remain in your FTP queue).
- Return to your WordPress Admin Dashboard, navigate to Appearance $\rightarrow$ Themes, and click Activate under the newly visible Avada thumbnail.
Once activated, verify that the Avada Dashboard is available and continue with installing the required Avada plugins.
4. Complete the Avada Setup After Installation
After activating Avada, there are a few additional steps to complete before you start building your website. These include installing the required plugins and importing a starter website if you don’t want to build everything from scratch.
4.1. Install Required Core Plugins
Before you begin designing your website, install the required Avada plugins. These plugins provide the page builder and essential functionality used throughout the theme. Without them, many layouts and demo websites won’t work correctly.
| Plugin | Purpose |
| Avada Builder | Build pages using the visual editor |
| Avada Core | Provides essential theme functionality |
To activate them, navigate to Avada $\rightarrow$ Plugins / Add-ons in your WP Dashboard. Click Install & Activate next to both core plugins. You may also selectively install premium bundled plugins such as Slider Revolution, LayerSlider, or WooCommerce depending on your site requirements.
4.2. Import Pre-Built Websites (Optional)
If you don’t want to build your website from scratch, Avada includes a large collection of professionally designed starter websites that you can import with just a few clicks.
- Go to Avada $\rightarrow$ Websites.
- Filter through over 100+ professionally designed demos (e.g., Corporate, Fitness, Shop, Agency).
- Hover over your preferred design and click Import.
- Select whether you wish to import Full Content or selectively import specific pages, forms, or sliders.
- Confirm your selection and allow the automated installer to run. Once finished, click Preview Site to verify your layout.
If the imported website doesn’t display correctly, clear your website cache and verify that all required plugins have been installed before running the import again.
5. Troubleshooting Common Installation Errors
| Error | Cause | Solution |
| “Are You Sure You Want to Do This?” / “Link Expired” | upload_max_filesize or post_max_size is too low. | Increase the PHP upload limits or install Avada via FTP. |
| PCLZIP_OPT_EXTRACT_UNDIR | The wrong ZIP package was uploaded instead of the installable Avada.zip file. | Extract the download package and upload only Avada.zip. |
| Demo import stops at 99% | The server timed out while importing media files. | Increase memory_limit to 256M and max_execution_time to 300 seconds, then try again. |
| White Screen of Death after activation | PHP memory exhausted or plugin conflict. | Increase the PHP memory limit and temporarily deactivate other plugins before activating Avada again. |
6. Frequently Asked Questions
1. Can I update Avada after installing it?
Yes. To keep your website secure and compatible with the latest version of WordPress, it’s recommended to update Avada whenever a new version becomes available. Before updating, always create a full website backup and verify that your plugins and hosting environment are compatible with the new release.
2. Why does Avada installation fail?
The most common causes include uploading the wrong ZIP package, insufficient PHP memory, low upload limits, or server timeout settings that don’t meet Avada’s recommended requirements. Checking your server configuration before installation can help prevent most of these issues.
3. Can I install Avada on localhost?
Yes. Avada can be installed on local development environments such as LocalWP, XAMPP, MAMP, or Laragon. Just make sure your PHP version and server settings meet Avada’s recommended requirements.
4. Do I need to install Avada Builder and Avada Core?
Yes. These are the two required plugins that power Avada’s page builder and core functionality. Without them, many layouts, starter websites, and theme features won’t work correctly.
5. Where can I download the latest version of Avada?
If you’re looking for the latest version of Avada, PluginPro provides regularly updated downloads starting from $4.5 per item. If you build or manage multiple WordPress websites, you can also choose one of the membership plans to access a large library of premium WordPress themes and plugins.
6. Conclusion
Installing Avada correctly is the foundation of a stable and well-performing WordPress website. By preparing your server, using the correct installation package, and completing the recommended post-installation setup, you can avoid many common issues and start building your website with confidence.
Whether you’re creating a business website, portfolio, blog, or WooCommerce store, following the steps in this guide will help ensure a smooth Avada installation from start to finish.
If you’re looking for more WordPress tutorials, setup guides, and regularly updated premium themes and plugins, visit PluginPro to explore our growing collection of WordPress resources and downloads.